As a cyclist, one of the most frustrating experiences is getting a flat tire during a ride. Fortunately, with a little know-how and the right tools, fixing a punctured inner tube is a straightforward process. Rather than replacing the entire bicycle inner tube, which can be expensive and wasteful, patching the tube is a more cost-effective and environmentally-friendly solution.
By learning how to patch a bicycle inner tube, you can quickly and easily repair punctures and get back on the road. In this guide, we will take you through a step-by-step process on how to patch a bicycle’s inner tube.
So you can confidently handle any unexpected flat tires that may come your way.
Why do bicycle tires go flat?
Bicycle tires are essential components of a bicycle, but they can go flat for several reasons. Here are some common reasons why bicycle tires go flat:
Punctures:
Flat tires are most commonly caused by punctures. Sharp objects, such as glass, thorns, or nails, can puncture the tire and cause the tube to deflate.
Pinch flats:
Pinch flats occur when the tire is compressed between the rim and an obstacle, such as a pothole or curb. This causes the tube to be pinched between the rim and the obstacle, resulting in two parallel punctures.
Valve issues:
The valve stem is a vulnerable part of the tube, and it can be damaged if the valve cap is not tightly secured or if the valve is bent.
Wear and tear:
Over time, the tire rubber can become thin and brittle, making it more susceptible to punctures and leaks.
Underinflation:
When a tire is underinflated, it can cause the tire to pinch or fold, leading to premature wear and tear, as well as an increased risk of punctures.
Overinflation:
Overinflating a tire can cause it to burst, resulting in a flat tire.
Damaged rim tape:
Rim tape protects the tube from the sharp edges of the rim. When the rim tape becomes worn or damaged, it can cause the tube to puncture.
How to avoid getting a flat tire
- Check tire pressure regularly
- Inspect tires before riding
- Avoid riding over debris
- Use puncture-resistant tires
- Install tire liners
- Avoid overloading your bike
- Learn proper riding techniques
By following these steps, you can reduce the risk of getting a flat tire and enjoy a more hassle-free riding experience. However, it is still important to be prepared and know how to patch or replace a tube if you do experience a flat tire while riding.
What supplies do you need to patch a bicycle’s inner tube?
To patch a bicycle inner tube, you will need the following supplies:
Patch kit:
A patch kit contains patches, sandpaper, and adhesive. You can purchase a patch kit at your local bike shop or online.
Tire levers:
To remove the tire from the wheel, you can use tire levers. You will need at least two tire levers to complete the process.
Pump:
A pump is used to inflate the tire once you have repaired the puncture.
Make sure you have all these supplies on hand before you start repairing your inner tube. It is also a good idea to practice patching a tube at home before you need to do it on the road or trail. This way, you will be prepared and confident when you need to patch a tube in a pinch.
Tips and tricks for Patch a Bicycle Inner Tube
Here are the step-by-step instructions on how to patch a bicycle inner tube:
Materials Needed:
- Bicycle with a punctured inner tube
- Tire levers
- Patch kit (including patches, sandpaper, and adhesive)
- Pump
Steps:
- Remove the wheel. Follow the steps mentioned earlier to remove the wheel from the bicycle.
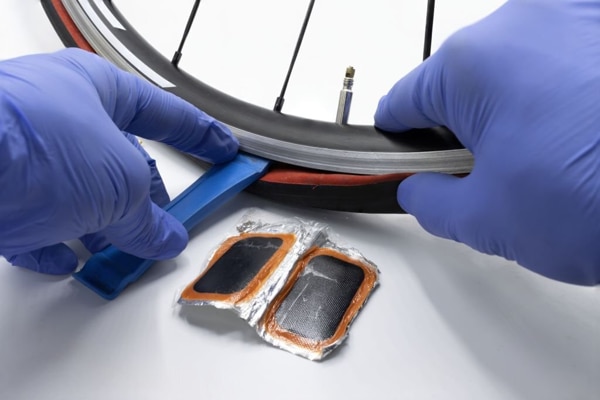
- Remove the tire. Use tire levers to pry the tire away from the rim on one side, and then remove the bicycle inner tube from the tire.
- Locate the puncture. Inflate the inner tube slightly and listen for a hissing sound. You can also submerge the tube in water and look for air bubbles to locate the puncture.
- Prepare the puncture site. Use the sandpaper included in the patch kit to roughen the area around the puncture. This will make the adhesive stick better.
- Apply the patch. Peel the backing off the patch and apply it firmly over the puncture, ensuring there are no air bubbles trapped underneath.
- Reassemble the inner tube and tire. Put the inner tube back inside the tire, making sure the valve stem is aligned with the hole in the rim. Carefully push the tire back onto the rim, starting at the opposite side of the valve stem and working your way around. Use your fingers to make sure the tire is seated properly.
- Inflate the tire. Use a pump to inflate the tire to the recommended pressure, which is usually printed on the sidewall of the tire.
- Check for leaks. Once the tire is fully inflated, listen for any hissing sounds or feel for any air escaping from the puncture. If the patch is properly applied, there should be no air escaping.
By following these steps, you can easily patch a punctured inner tube and get back to cycling in no time. Remember to always carry a patch kit and pump with you on your rides so that you are prepared for any unexpected punctures.
Conclusion:
Every cyclist should know how to patch an inner tube of a bike. It is a relatively simple process that can save you time and money in the long run, as well as prevent unnecessary waste of resources. Having the right supplies on hand, such as a patch kit, tire levers, and a pump, can make the process of patching a tube much easier and more efficient.
By following the step-by-step instructions outlined in this guide, you will be able to successfully patch a punctured inner tube and get back on the road or trail quickly. Remember to take your time, be patient, and practice at home before you need to patch a tube in the field. With these tips and tricks, you will be a pro at patching bicycle inner tubes in no time!
Want to learn more about maintaining your bicycle tires? Check out our other posts on bicycle tire pressure and emergency fixes for flat tires. And if you need to patch a tube, visit our website for a quick and easy fix!